+8615820889696
 Info@cowint.com


Introduction: Owning a quality heat press is the starting point for DTF printing, but precise control of temperature, pressure, and time truly determines final output quality.
Many DTF practitioners invest heavily in high-end printers and consumables, only to stumble at the final step—heat press transfer. In fact, preparation affects over 30% of final output quality. No matter how advanced your printer or how premium your inks, improper heat press parameter settings will undermine everything. This article provides a complete DTF heat press setup and calibration guide, helping you master the precise balance of temperature, pressure, and time.
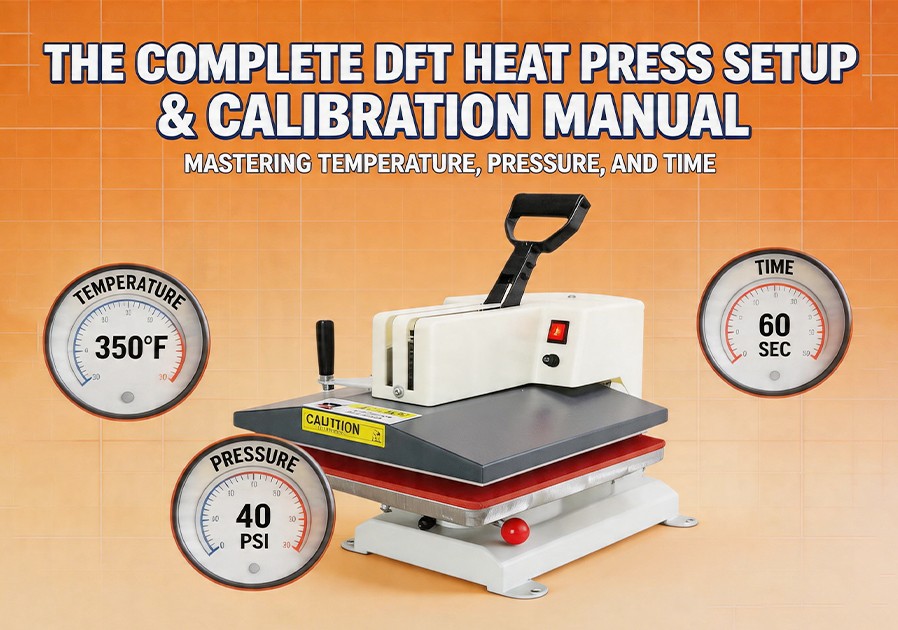
1. The Three Core Parameters of DTF Heat Press Transfer
In DTF heat press transfer, temperature, pressure, and time form the “iron triangle”—correctly matching these three is the foundation of perfect transfer. Any parameter deviating from the optimal range can lead to insufficient adhesion, color distortion, print blistering, or fabric damage.
Temperature
The standard heat press temperature range for DTF printing is typically 165°C to 180°C, depending on fabric type, film specifications, and hot-melt powder characteristics. General reference ranges also suggest 130°C to 160°C, with 160-170°C for certain materials.
Core principle: “Hot enough to melt the powder and achieve full adhesion, but not so hot as to damage fabric fibers.” Heat-sensitive fabrics like polyester require lower temperatures (140-150°C), while cotton and denim can withstand slightly higher temperatures (160-170°C).
Pressure
The ideal pressure range for DTF transfer is 60-80 PSI. Too low pressure results in insufficient powder-to-fabric adhesion, making prints prone to peeling. Too high pressure flattens fabric fibers, creates permanent press marks, and makes prints feel stiff.
For most DTF applications, medium pressure is a good starting point. Adjust gradually based on test results—heavy fabrics need higher pressure for full powder penetration; lightweight fabrics need slightly lower pressure to avoid press marks.
Time
Standard press time for DTF printing typically ranges from 10-20 seconds. Lightweight fabrics follow a “high temperature, short duration” strategy (165-170°C, 10-12 seconds). Heavy fabrics like hoodies and denim require longer times (15-20 seconds) to ensure adequate heat penetration.
2. Pre-Press Preparation — Prerequisites for Successful Transfer
Pre-press preparation is the most overlooked but critical step in DTF heat pressing. Here is the checklist before each press:
Fabric preparation: Ensure the fabric is completely dry, wrinkle-free, and dust-free. Even trace moisture affects powder melting and adhesion. Pre-press the fabric for 3-5 seconds before transfer to remove moisture and wrinkles.
Film preparation: Check that the printed design on the DTF transfer film is fully cured and dust-free. Powder should evenly cover all ink areas with no clumps or blank spots.
Workspace conditions: Maintain stable temperature, 40-60% humidity, dust-free environment, and no airflow disturbances. Ambient airflow distorts sensor accuracy—the silent culprit behind most temperature control failures.
Protective materials: Use polyimide heat-resistant tape to secure the transfer film (standard tape breaks down under heat and contaminates fabric). Place a Teflon sheet over the platen for protection.
3. Heat Press Calibration — The Importance of Regular Verification
Heat press calibration is not a one-time task but a routine production operation. Here is a complete calibration process:
Temperature calibration: Using a calibrated thermocouple thermometer or infrared thermometer, measure actual temperature at multiple points across the platen. Compare readings to the heat press control panel display. Apply temperature compensation calibration per the equipment manual if deviations exist.
Pressure calibration: Verify pressure uniformity using a force gauge or calibrated weights. Place pressure sensors at all four corners and center of the platen to ensure consistent pressure distribution. For pneumatic heat presses, regular calibration ensures pressure and temperature remain within optimal ranges.
Timer calibration: Verify heat press timer accuracy against a stopwatch or reference clock. A timer off by even a few seconds creates consistency issues in batch production.
Calibration frequency: Perform full calibration quarterly, or whenever changing consumable brands or fabric types.
4. Recommended Parameters by Fabric Type
| Fabric Type | Temperature Range | Press Time | Pressure | Special Notes |
|---|---|---|---|---|
| 100% Cotton (lightweight) | 160-165°C | 10-12 sec | Medium | High temp, short duration |
| 100% Cotton (heavyweight) | 165-170°C | 12-15 sec | Med-High | Ensure heat penetration |
| Hoodie/Fleece | 165-170°C | 15-20 sec | Med-High | Increase pressure 10-15% |
| Polyester/Blends | 140-150°C | 8-12 sec | Medium | Lower temp prevents dye migration |
| Denim/Canvas | 165-170°C | 15-20 sec | High (65-75 PSI) | Deep fiber penetration |
| Leather/PU | 150-160°C | 8-12 sec | Medium | Avoid heat damage |
| Spandex/Sportswear | 140-150°C | 8-10 sec | Med-Low | Fast, low-temp pressing |
5. Common Heat Press Problems and Solutions
Problem 1: Poor adhesion or print peeling
Possible cause: Temperature too low, pressure insufficient, press time too short.
Solutions: Increase parameters gradually—raise temperature 5°C first, then add 5 seconds, then increase pressure.
Problem 2: Press marks or scorching on fabric
Possible cause: Temperature too high, pressure too high, press time too long.
Solutions: Reduce temperature 5-10°C, decrease pressure, shorten press time. For heat-sensitive fabrics like polyester, prioritize temperature reduction.
Problem 3: Partial transfer failure
Possible cause: Uneven platen temperature distribution; uneven pressure distribution.
Solutions: Measure platen temperature at multiple points with thermocouple thermometer; check platen flatness; clean platen residue.
Problem 4: Print cracking after washing
Possible cause: Insufficient powder curing; missing second press; mismatched powder type.
Solutions: Ensure powder fully melts to transparent before transfer; perform 3-5 second second press with parchment paper; verify powder type matches fabric.
6. Heat Press Standard Operating Procedure (SOP)
Step 1: Preheating — Turn on heat press, set target temperature, allow 5-10 minutes preheating. Do not start production before reaching target temperature.
Step 2: Pre-press fabric — Place fabric in press, pre-press 3-5 seconds to remove moisture and wrinkles.
Step 3: Position transfer film — Place DTF transfer film on pre-pressed fabric (design side down), secure corners with heat-resistant tape.
Step 4: Apply protection — Place Teflon sheet over transfer film.
Step 5: Heat press — Close press, apply heat and pressure for the set time.
Step 6: Peeling — Peel film according to type (hot peel or cold peel) at the specified temperature.
Step 7: Second press — Cover print with parchment paper, press for 3-5 seconds (optional but recommended).
Step 8: Cooling — Allow finished product to cool naturally in a ventilated area. Do not stack until completely cool.